
Every holiday at a Disney park means a new overlay of festive decorations. I love the wreaths that adorn the street lamps during Mickey’s Not-So-Scary Halloween Party. I decided to challenge myself with the task of creating my own wreath. A “Mickey’s Not-So-Scary Halloween Wreath”, if you will.

(Ali Nasser, photographer)
Walt Disney World’s Halloween Wreath
The wreaths actually light up at night when you’re at the parks. I’m not an Imagineer, so I was going to have to fake that part.
OK, fine. I totally tried to make this light up and I failed spectacularly. So, moving on…
How To Make A Disney Halloween Wreath
To make your wreath, you’ll need:
- A Craft Pumpkin Half
- GrapeVine Wreath (sized to coordinate with your pumpkin)
- Fall Floral Items
- Hot Glue
- Floral Wire
- Air Dry Clay
- Orange Paint
- Yellow Paint
- Cutting Tools
- Large Button Blanks (or something similar to use as the ears)
 Grab my Mickey pattern above and print to size for your pumpkin. If you have a Silhouette, you can also grab my cut file to create your stencil. My pattern doesn’t include the tongue, but I have total confidence that you can make your own tongue free-hand.
 Trace around your pattern with a craft knife. Then use whatever tools you can find to carve out the design, making sure you don’t go all the way through the back of the pumpkin. I found that a small, flat-head screwdriver made an effective chisel. Be prepared-this creates a huge mess! If you do poke all the way through, just throw some duct tape on the back of the pumpkin to hold it in place.
 The hardest part of this project was finding something the right size to create the ears. I ended up with large DIY button kits from the craft store. Use your craft knife to create a hole for the button blanks. Secure in place with hot glue, duct tape or both. Fill in any gaps with a little air dry clay.
 One you have the basic pumpkin head together it’s time to paint. Give everything a coat or two of orange paint.
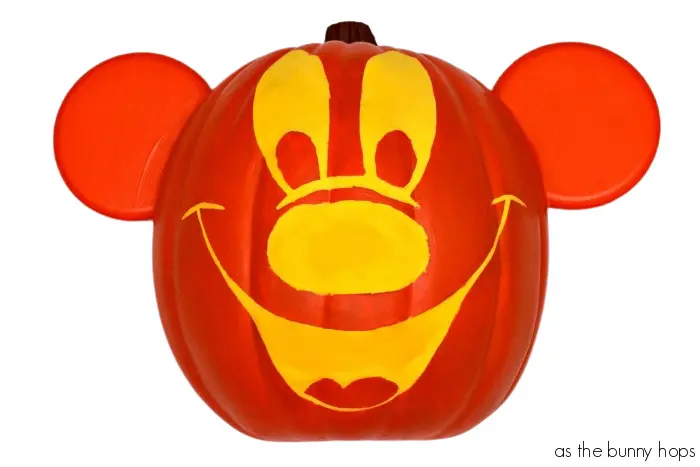 To create the faux candlelight, add just a touch of yellow acrylic paint to a handful of air dry clay. Once it’s mixed, wash your hands before the next step to get ride of the extra paint on your hands.
Smooth the tinted clay into the Jack O’lantern face, keeping your fingertips slightly wet to create a smooth surface. Baby wipes are great and helping to clean up the extra clay that gets anywhere on the pumpkin that you don’t want it. Another warning-this is messy, too. I did this step standing beside the sink. If your clay isn’t completely smooth, you can do some light sanding once it’s dry.
 Once the clay has had a chance to harden, your pumpkin Mickey is ready for the wreath. Use your craft knife to poke four holes in the sides of the pumpkin and use floral wire to attach the pumpkin to the wreath.
  Add your fall floral items to the wreath in a random pattern using hot glue. You can remove any hot glue spider webs with a few blasts from a hot hair dryer.

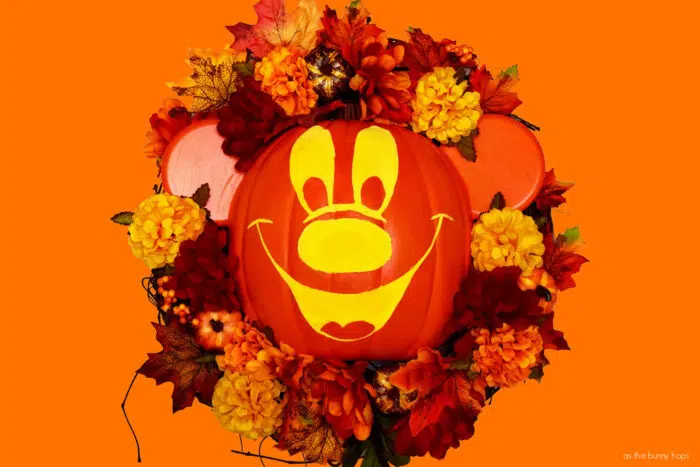
Don’t be afraid to completely deconstruct the floral stems you purchase to create the perfect look.
Once you’re satisfied with your flowers and leaves, your not-so-scary Halloween wreath is ready to hang!
DIY Disney Halloween Decor and Costumes